wonderer

Monday, August 31, 2015

Creme Brûlée

Creme Brûlée
Cuisine: French
Course: Dessert

Recipe
Serves: 4

Ingredients
Custard Base

  • Heavy Whipping Cream - 473 ml (1 pint)
  • Sugar - 1/4 Cup (45 grams)
  • Egg Yolks - 3 large eggs
  • Vanilla - 1 teaspoon (or use 1/2 vanilla bean)
  • Salt - 1 pinch
Sugar for caramelization
  • Sugar - 1/4 Cup (45 grams)
Equipment: Whisk, Sauce Pan, Ramekins, Deep Dish, Blow Torch

Preparation
Oven Temperature: 325 F
Time in Oven: 30-40 mins

Step 1: Mix 1/4 cup sugar to egg yolks.
Step 2: Warm up the heavy cream, mix the vanilla and salt.
Step 3: Bring heavy cream to a quick boil, pour it into the egg yolks/sugar mixture and whisk vigorously.
Step 4: Preheat oven to 325 F. Pour the custard base into small ramekins. Setup the ramekins in a water bath and keep them in the oven for 30-40 mins until set. They will be slightly wiggly when set.
Step 5: Bring the set custard base to room temperature. Refrigerate for 4 hrs or more.
Step 6: At the time of serving, spread some sugar at the top of the cold custard and caramelize it with the help of a blow torch. Serve with raspberries and mint.


Wednesday, December 1, 2010

Moon Fascination

Here is a resultant of my recent fascination with the Moon... its the full moon on 21st Nov 2010 shot in Charlotte NC.

Equipment Used:
Canon 7d
Sigma 70-300mm f/4-5.6 DG APO Macro Telephoto Zoom Lens
Kenko 2.0X PRO 300 Teleconverter DG


Some references and websites which might help you in photographing the moon
  • Moon like all galactic bodies rises from the east and sets in the west. Moon cycle is around 29.5 days. Every day the moon rise time moves forward by approximately 50 mins. Here are a couple of websites to determine the exact location of moon - Moongiant.com and dailymoonposition.com
  • The moon might look bigger when its near the horizon but it is actually the same size on any given day... this is called the moon illusion.
  • The orbit of moon is elliptical so on some days its closer to the earth (Perigee) and on some its farther away (Apogee). So a full moon during Perigee would actually be bigger than a normal moon. Here is a nice Lunar Perigee and Apogee Calculator.

Friday, November 12, 2010

Bhutte Ki Kis (grated sweet corn snack)

As a kid I have spent most of my summer vacations in Indore, MP. Playing marbles in the back alleys of Raj Mohalla, running around with my friends at the Ramakrishna Park, renting cheap but innovative bikes from Kabaadi and eating some really really good food both at home and from street vendors...especially the vendors at Sarafa. Sarafa is a shopping heaven for ladies ...its a maze of crowded narrow streets jutted with shops for gold ornaments, cloths, kitchen appliances and of course street vendors lined up with tangy, sweet and spicy food designed especially to pleasure women. The last part is probably the only satisfying thing for men while their pockets are getting emptied. The line up of snacks is pretty exciting Kachodi, Samosa, Dahi Vada, Patise, Gulab Jamun, Rabri, Usal Poha, Bhutte Ki Kis, Moong ka halwa and the Meetha Paan. You can find many of these at many other places but the warmth and taste of Sarafa is probably the gold standard.


Here I have the recipe of Bhutte Ki Kis which is a creamy, tangy and sweet dish made out of grated corn and milk. Let me clarify once... the Kis or Kees or Khees here means grated...so Bhutte ki Kees is made out of grated sweet corn. In Sarafa stores they sprinkle a special cumin spice mix called zeeramal... I am not sure what that mixture is so at home we use a little chaat masala to sprinkle on the top...all right so here is the recipe -

Bhutte Ki Kis

Ingredients
  • 4 sweet corns
  • 1 cup grated dry coconut
  • 1/2 litre whole milk
  • 1 tea spoon cumin seeds
  • 1 tea spoon mustard seeds
  • 10-15 curry leaves
  • 5 chopped green chilies
  • a pinch of turmeric
  • 1 tablespoon of oil/ghee
  • 1/2 tea spoon of salt
  • 1/2 lemon
  • coriander leaves for garnishing
  • zeeramal/chaat masala
Preparation
  1. Finely grate 4 sweet corns. Do not grate too deep into the cob of the corn... otherwise finally the taste of the dish might become a little bitter.
  2. Heat up 1/2 tablespoon of oil in a deep pan, add grated corn and cook for about 2-3 minutes.
  3. Pour around 1/2 liter of whole milk, mix and let it cook for a while (about 15-20 mins). Keep stirring and see that the milk doesn't stick to the bottom of the pan.
  4. When the mixture becomes a little dense add 1 cup of grated coconut, a pinch of turmeric and around 1/2 tea spoon of salt. We don't put  a lot of salt in this dish... so try to keep it a little low.
  5. Continue cooking to get the mixture to a semi solid consistency.
  6. Now ready the tempering (tadka) - in a small frying pan heat 1/2 tablespoon of oil and add mustard seeds, cumin seeds...then add chopped green chilies and curry leaves. See that it doesn't get burnt.
  7. Mix the tempering (tadka) to the cooked grated corn.
  8. Thats it...Bhutte Ki Kis is ready...serve it warm and you can garnish with chat masala/zeeramal, chopped coriander, grated coconut and lemon.
My mom taught me this recipe and I have always loved it. Try it out...and let me know if you like it.

Monday, November 1, 2010

Hiking Lost Coast, Northern California

This summer we made a trip to Lost Coast in Northern California. This was my second trip with my friends from IIIT. We had thought about going to Lost Coast an year before but we ended up going to Desolation Wilderness in the Lake Tahoe region that time.

Lost Coast is really a coastal region lost in itself. It is located remotely in Northern California sublimely away from human civilization but having an amazing closeness to the Pacific and a landscape which seems to have both a mellow and a tough attitude, I guess thats the result of living in solitude of such rough wilderness.

This is not a normal hike....when you decide to go to Lost Coast you need to plan a little in advance. This is mainly because of 2 factors - the shuttle and the high tides. Shuttle comes into picture because the start and the end point for this hike are not the same. Most folks start at Mattole and hike for around 25 miles over 2-3 days to end at Shelter Cove. So people generally park their cars at Shelter Cove and take the 2 hr shuttle to Mattole. We took the shuttle operated by Sherri - here is her website http://www.lostcoastshuttle.com/. We were 6 guys who settled into the big van...it cost us $50 each but gave 4 extra hours, kind of worth it.

High tide comes into picture because there are certain sections in the 25 mile stretch which become impassable during the high tide. So you need to consider the tide chart for Shelter Cove
region before you start making any plans, as this will decide how many miles you would be able to cover each day and where you can camp. Somethings good to know about the tides..there are 2 low tides and 2 high tides every 24 hrs, so there is a difference of approximately 12 hours between the high tides. Water gradually rises during the high tide until the time listed on the tide chart and then gradually ebbs...so you would not be able to cross the impassable section for approximately 2 hrs before and after the time listed. Also note that the tide times shift forward by around 50 mins each day, so if there is a high tide at 2:30 PM today...you can expect a high tide at around 3:20 PM tomorrow.

Day 1: San Francisco -> Shelter Cove -> Mattole -> Punta Gorda -> Cooskie Creek
We started from San Francisco at around 4 AM for Shelter Cove which is around 5 hours drive. Stopped for breakfast at The Maple Restaurant in Ukiah. There we were able to catch the Germany Vs Argentina quarterfinal of the FIFA world cup..Germany was astonishing and it thwarted Argentina to win 4-0. Imagine the start of a trek with such an high energy game. It's a beautiful drive on the Redwood Highway to Shelter Cove with red woods on both sides of the road and a lot of twists and turns. We reached Shelter Cove at around 11 AM where we parked both our cars and took the 2hr shuttle to Mattole.

We started the hike at around 1:30 PM from Mattole. The first thing you will notice, as soon as you start is the sand. It is tiring to walk on the sand, it really made me think about the camels and their hoofs. The wind was blowing strong but it was cool...and it was so cool along the Pacific Ocean that it just took away all the tiredness from the journey. It was really nice and since it was blowing from North to South it was helping us in our stride...just that it was also blowing the sand to our bare legs...making it feel like needles.

After walking for little over 2 hours we reached Punta Gorda Lighthouse. We took our lunch break there. Its an abandoned light house but it would have been really courageous to have lived in the building and maintained it in the early 19th century.

After Punta Gorda we were in the high tide time zone and we had to cross the impassable section in order to move forward. We entered the impassable section and it became really tough to climb up and down the rocks beside the ocean...but somehow we managed to reach the Cooskie Creek around 7 PM and decided to camp there. We were tired after walking for around 6 miles on the sand and climbing those rocks...with all the wind blowing it was tough to setup the tents but the boys finally managed it...then it was time to eat, sit next to the bonfire, talk a little and sip some cognac.

Day 2: Cooskie Creek -> Big Flat (Rattlesnake Ridge Trail)
We had to cover 10 miles on Day 2. We got up late in the morning, had a relaxed breakfast and were ready for the long hike by 11 AM.
First few miles were again in the rocky section but then we got on to a trail with firm ground...believe me it felt so good after those long walks on sand, rocks and pebbles. It was like walking in a grassland, with higher up on your left are the small hills of red wood trees and on the right you have the vast blue Pacific. It was a long walk, which occasionally trailed in the sand but always came back to the firm ground.

We took a few breaks at the creeks, it was heavenly to take off your hiking shoes and soak your feet in the running cold water. After walking for around 7 hours we reached the Rattlesnake Ridge Trail...there is a big private farm house...it seemed exotic.


The trail head of the Rattlesnake Ridge Trail marks the start of Big Flat...which is quite famous for surfing...we didn't see any surfers, never the less we decided to strip down and dive into the Pacific. The huge waves struck us hard and they were sheer cold and salty...believe me now I understood that 10 mins in this ocean without a body suite would really kill you.We camped at the Big Flat...it was so windy that we were not able put up our small tent...so we all got into the big one. We were tired and wanted to sleep...at night two raccoons attacked our camp and we could hear them scratching our backpacks outside our tent...thankfully we had kept all our food at some distance in bear canisters and they didn't cause much damage. Day 2 ended with an eventful night, no one slept properly and we had another long day ahead of us.

Day 3: Big Flat -> Black Sands Beach -> Shelter Cove -> San Francisco
We woke up to see a dense foggy morning and were ready to go after a quick breakfast, anxious to get over with the hiking and get back to San Fran.

We started at around 9 AM on a trail with firm ground, which soon became scattered with rocks and pebbles and later on turned into the Black Sands beach. It was again a slow long walk along the ocean...the fog in the trees above you gave a very dreamy and lost effect to the entire surrounding...very surreal. The cool weather made it better and we made quite a headway.

In between we left our backpacks and decided to take a side trail up a hill filled with green trees, bushes and flowers. We took some long breaks and spent time admiring some interesting shaped driftwood, ship wreckage and carcasses of sea lions we found on our way...finally reaching the Black Sands beach near Shelter Cove.

It is one of most beautiful, pristine and untouched beach I have ever seen. As the name says, it has black sand which if you look closely is like the perfect replica of grain sized beautiful, shiny pebbles. As if the Pacific has been crushing these pebbles into fine grains... very serene and beautiful. Well the hike ended when we reached Shelter Cove at around 4 PM. We rested a while, took our cars and then left for San Francisco. In between we stopped at Ukiah Brewing Company for dinner, which was a fitting end to this long trek.


Lost Coast is certainly not a pleasurable and relaxed hike but it has an experience of its own...it is a long weary walk, probably the best way to build a closeness to the Pacific and experience the lost landscapes around it. I can still hear the sound of the waves crashing against the coast. While I was there, I could feel that my mind was wide awake but still lost in witnessing the vividness of the Pacific and the landscape of the lost coast. It was a nice trip.

Summary & References
Hiking the Lost Coast in Northern California
Dates: 3 July 2010 - 5 July 2010 (3 days)
Start: Mattole -> End: Shelter Cove (24.8 miles)
Team of six: Abhay Sukumaran, Ajay Joshi, Ashok Kumar Meena, Nishant Joshi, Ritvik Mayank and Sumit Saluja
Map of Lost Coast -> This is probably the best map of King Range that I could find on the web
King Range Website -> This website has host of information about the trails, maps, weather, tide charts, etc.

Sunday, October 10, 2010

Fall Colors - Charlotte, NC - Year 2010

I had heard about fall colors in North Carolina a lot and have made a couple of trips to Grandfather Mountain and the Smokies in the past but only this time I witnessed the beauty and vividness of its colors.


Charlotte is a beautiful city with a lot of green cover and need less to say a great weather. In the months of September - October, fall season sets in and the green cover of the trees starts to turn into a mixture of bright yellow, orange and rusty red. Its wonderful to gaze at the beauty and the color of just one leaf or a tree but its absolutely breathtaking to see an entire mountain range painted in these colors.


Its important to go at the right time, if you go too early (Aug-Sep) you will find it all green or if you go too late, like I did last time in November, when it was worse as most of the leaves had fallen off or had turned brown by then. The best time to go is in mid October I suppose.

I am not a big fan of Grandfather Mountain, which is probably just a destination...the real fun is to drive on the Blue Ridge Parkway... which I believe is the most beautiful road in America during the fall season. This is the right time for that convertible or even better to roar on those curvy roads in a Harley.

Sunday, April 4, 2010

Jack of the Wood

Asheville is a small and beautiful town on the base of Smokies and every time I go there I am tempted by the music, the alcohol and the atmosphere of this wonderful place called Jack of the Wood.
I am delighted to have discovered this place... it is always vibrant with the music and the hustle & bustle of a lively pub. Sometimes its difficult to find a table so it might be wise to make a reservation especially on one of their live music performance night. They have some excellent ales brewed locally at the Green Man Brewery. So if you would like to spend an amazing evening at Asheville chatting with friends, enjoying live music and sipping some cold beer then don't miss out on the Jack while you are there.


Here is a live recording of a band playing Irish music. I am sure you would be seduced.


Sunday, October 25, 2009

Shakshouka

When I was in New York... I frequented a small restaurant - Hummus Place. Its a small restaurant in Greenwich Village serving Mediterranean Cuisine. They have simple and well made vegetarian dishes which feel healthy and light. I was at this place with a bunch of friends and we were ordering everything in the menu... falafel, salad, stuffed grape leaves, different preparations of hummus etc etc...I came across this very interesting dish on their menu - Shakshuka. The description was simply eggs on Mediterranean tomato stew... and I thought it would be a dish quite similar to the North Indian Egg Curry. Well it arrived in a sizzling pan with a thick tomato sauce and eggs with sunny side up....and I was instantly hungry at the sight of it. Grabbed some warm pita and dived into it. It was spicy and tangy preparation of eggs and I just loved it. I had it a couple of times more at this place and later decided to prepare it at home. Here is my version of Shakshuka...hope you would like it :)

Ingredients (for 2)
½ Big Onion – finely chopped
2 small tomatoes – coarsely chopped
3 eggs
2 table spoons of Cottage Cheese
1-2 Jalapeño Pepper
½ spoon red chili powder
1 spoon cumin powder
1 table spoon thinly sliced ginger
Olive Oil to cook
Salt to taste
Black Pepper (if you like)

Preparation (Cooking Time – 15 mins)

Pour olive oil in a shallow pan…warm it up
Put chopped onions…let them turn slightly golden brown
Put jalapeno pepper, sliced ginger, cumin powder, red chili powder and salt. Cook for a minute or two.
Put the tomatoes in…cook for a while…until tomatoes are done…and you have the curry
Put cottage cheese…cook for a minute
Now make 3 small spaces in the pan and carefully place the 3 eggs…without breaking the yolk and keep the sunny side up.
Cook for a while. Cover the pan and again cook until the eggs are done

Serve the dish in the pan used for cooking….with warm fresh pita bread...its heavenly especially if it’s raining outside :)

Thursday, August 27, 2009

Camping - Lake Tahoe Desolation Wilderness

Trip: Camping - Lake Tahoe Desolation Wilderness
Dates: 21st Aug & 22nd Aug 2009
Route: Glen Alpine Trail Head -> Angora Peak -> Lake Aloha -> Heather Lake -> Susie Lake -> Gilmore Lake -> Mount Tallac -> Cathedral Lake -> Fallen Leaf Lake -> Glen Alpine Trail Head
Lowest Altitude: 6300 ft
Highest Altitude: 9800 ft
Howlas: 5

Day 0 - Collect Gear and Pack
Individual Gear:
1 cap/hat, 3 t-shirts/dry-fits, 1 shorts, 1 swimming trunks, 1 track pants, 1 fleece, 1 rain jacket, 3 pair socks, 1 pair hiking boots, sunglasses, 1 head lamp, 1 eating bowl, 1 spoon, toilet paper, medicines, 1 sleeping bag, 1 sleeping pad, 1 backpack, some cash, cellphone

Group Gear (group size 5):
2 tents, 2 Matches/Lighter, Purification Pills, Sunscreen (70SPF), Ziploc bags, mosquito repellent, duct tape, compass, 2 knives, 1 detailed map, 2 bear canisters, 2 cameras, for cooking - 2 pots/stove/fuel, food - carry mostly dry precooked food, extra batteries, 2 cameras, hand sanitiser.

With the above stuff...each backpack weighed between 26-30 lbs.

Activity: 5 of us got together at 5 PM on the Enterprise at El Camino Real to checkout the rented Kia. Chilled out at the swimming pool. Went to Stanford University to rent the camping gear at around 8 PM. It came to around $35 per person. Then we decided to eat some sushi...so we went to Sushitomi in Mountain View. It was nice. We were back by 10 pm. We packed and chatted till 12:30 AM...until we realized it was time to sleep.

Day 1: Drive to the Glen Alpine Trail Head & the 6 mile climb

Got up in the morning at around 3:30AM and were on the road by around 4:45AM on our crammed Kia. We had to reach the Rangers Station in order to get the permits for camping. The plan was to camp at Lake Aloha and there are only 36 people allowed in that area. We stopped for breakfast in between and were lucky enough to reach on time to collect the last 5 permits.

Map of the drive from Mountain View (A) to Glen Alpine Trail Head (C) through RangersStation (B)


We spent quite some time to find the Rangers Station. After getting the permits we started for the Glen Alpine Trail Head which was another hour. By the time we reached the Trail Head it was 11:30AM.

Address of the Rangers Station
United States Government Forest Service: Pacific Ranger Station
7887 Highway 50
Pollock Pines, CA 95726-9110
(530) 644-2349

We parked the battered Kia on the Glen Alpine Trail Head. Ate some bananas, took a pee on the rock, applied the sunscreen and were ready to hike. We took the tougher of the two routes available - one was a 6 mile climb through the Angora Peak and the other one was a milder trek of 4.5 miles. It turned out that Angora Peak was really very tough, especially for the first time climbers like myself. It was a unmaintained trail and was a steep climb through rocks and bushes from 6300 ft to 8400 ft. We started at 11:45 AM and with our slow pace reached the top at around 4PM. You get some quite beautiful views of Lake Tahoe, Fallen Leaf Lake and Echo Lakes from Angora Peak. We had lunch of burritos when we reached marker for Echo Peak and Lake Aloha.

The tough climb was done and it was another 2 hrs mild walk after that to reach our campsite. We reached lake Aloha at around 6:30 PM and found a nice campsite to setup our tents. We had finished the drinking water we had brought with us. We got some water from the lake and purified it. We had hot chocolate and a delicious dinner of lasagna, meat balls and chicken breasts...thanks to preserved precooked mountain food. After that we just lay on the rocks and looked at the star filled sky. I had never seen so many stars and since it was a moon less night, it made the sky all the more brilliant. That long hard climb of Angora Peak was worth it. We slept at around 11PM.


Day 2: 10 mile trek through Gilmore Lake & Mt Tallac and the drive back

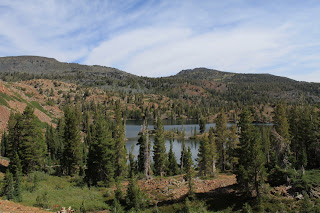
Got up in the morning at around 7:30AM and had breakfast of oatmeal, bagels and salami along with black coffee. Then we decided to change into our swimming trunks and spend some time playing in the water. It was refreshing and we got some nice pictures of the lake. After breakfast, swimming and the daily routines we started to move forward with our 10 mile trek.


Our first destination was to reach Gilmore lake while passing through Heather Lake and Susie Lake. We started at 10 AM and reached Gilmore Lake at around 1:15 PM. The trail is maintained all along so it was not as tough as the first day climb of Angora Peak. Also our altitude at Aloha lake was 8200 ft and we gradually descended to 7800 ft until Susie lake and then we moved up to 8400 ft at Gilmore Lake. We had a light lunch at Gilmore lake and decided to climb Mt. Tallac.

Base camp of Mt. Tallac was at 9400 ft while the peak is at 9700 ft. We decided to climb with our 28 lbs backpacks and then leave the backpacks at the base camp and climb to the peak of Mt. Tallac without them. It took us another 1 hour 15 mins to reach the base camp. The view from the peak of Mt Tallac was breathtaking. Lake Fallen Leaf looked like a small pond in front of Lake Tahoe. Mt Tallac is probably the tallest peak in that region and the panoramic view from its top is really beautiful. We spent some time taking pictures on the top and then started our descent.


The descent was tougher than expected. The terrain like everywhere else on the desolation was sometimes rocky, sometimes dusty and sometimes bushy. We had to descend around 3000 ft. We completed it in another 3 hours including a half an hour break at the cathedral lake. We were back to the Glen Alpine Trail Head by around 7 PM.


We were tired. We packed everything on the Kia and headed to an arbit Mexican bar...where I tried Mike's Hard Lemonade...which I hated. But the grilled chicken quesadilla felt good and we realized we had completed a nice trek.

Credits
The leader of our group was Abhay Sukumaran, who planned and managed the entire trek. The participants were - Nishant Joshi, Sumit Rangi, Tushar Shah and Sumit Saluja. The inspiration, i guess was for 5 friends to meet up after a long time. We may have been better off getting drunk at home....but none the less we realized that none of us has changed a single bit in 5 years. I also realized that you have to get your ass kicked to realize anything. Will do it again :)

Sunday, March 16, 2008

Italian Cooking - Lasagna Recipe

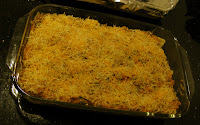
Now this one requires time and a little bit of expertise to make it, but once prepared you would realize that it is worth the effort. It is one of the best Italian dishes I have eaten, well probably because I ate the home cooked version. For people who don't know what Lasagna is - its another type of pasta. It comes in long flat strips, 3-4 cms wide and 12-15 cms long. Its prepared by making alternate layers of lasagna stripes, meat sauce and cheese one over the other. You prepare the sauce separately, boil lasagna and then make alternate layers. The outcome is layers of creamy, spicy, tangy and very tasty food. Well lets look at the recipe - its quite simple if you break it down into steps.


 Ingredients (for 5-6 servings)
  • 1 big chopped onion
  • 1 big chopped green bell pepper
  • 5-6 chopped green chilly
  • 1 large table spoon chopped garlic
  • 2 cup chopped spinach
  • 800 gm of Pasta Sauce
  • 400 gm Sour Cream
  • 1 large table spoon of red chilly powder
  • 2 tea spoons of Oregano
  • 500 gm ground chicken
  • 12 stripes of Lasagna 
  • Lots of Cheddar Cheese
  • Vegetable Oil
Preparation

Step 1 - Sauce Preparation
Start heating some oil (around 150 ml) in a large pan. When its slightly heated put 1 large table spoon of chopped garlic in it. After say 2 mins, add chopped onion and green chillies in the pan. When onions start to turn golden, add grounded chicken (keema), mix well and then cover it until the chicken gets cooked. Once the chicken is cooked add chopped green bell pepper and chopped spinach. Let it cook for sometime say 3-5 mins at medium heat then add salt, red chilly powder, Pasta Sauce (we used Francesco Rinaldi Chunky Garden Pasta Sauce) and oregano. Mix everything well and then leave it on medium heat until the spinach get cooked. When the spinach is cooked and the sauce is slightly thicker then turn off the heat and add Sour Cream to it. Mix it well and then taste the sauce - add extra salt, red chilly powder or Sour Cream as per your taste. All right your sauce is done now keep it aside. It is a creamy, spicy and tangy, i am sure you would love it. You can have your own version of sauce - just experiment carefully :)


Step 2 - Boil Lasagna
Boil water in a big bowl and add 12 stripes of lasagna, we used Ronzoni, Healthy Harvest whole wheat, you can use anyone available in your market. Also add some vegetable oil to the boiling water so that stripes of lasagna don't stick to each other. Cover it and boil the lasagna until it gets cooked. Once its done drain out the excess water and take out the lasagna stripes. Its very important that you don't overcook the lasagna and make it soggy. The stripes should be intact and see that they don't stick to each other. Ok you are done with step 2.

Step 3 - Layering
Hmm...Get a large rectangular glass bowl and apply a thin layer of oil on the sides and the bottom on the inside of the bowl. Now start making layers of lasagna stripes, sauce and cheese. First put 3 lasagna stripes in the bowl then put a layer of sauce on it and then sprinkle cheese on top of it, then start with another layer of lasagna stripes. Do it with for all the 12 lasagna stripes, so that you will have four layers. Cover the top most layer of lasagna with a lot of sauce and cheese. Cover the glass bowl with the silver aluminum sheet.

Step 4 - Oven
Lasagna is supposed to be served hot, so when ever you want to serve it just put the glass bowl in the oven preheated at 350 degree Fahrenheit and then keep it there until the cheese melts. It will take around 10-15 minutes. Once its done, take out the dish and serve.

Credits 
Ok again I learnt this from my Aunt - Pali Massi. I hope you liked it. You can make various variants of the sauce and also use it with normal pasta or noodles they all turn out to be equally tasty. Lasagna gets some extra points just because of its eloquent layering.