Photography is all about capturing light. The entire essence is captured in the meaning of the word Photo-graphy which means "drawing with light". On the other hand Optics is the study of light and it tries to explain the optical phenomenon in a scientific manner. We all have done optics experiments when we were kids. I have spent many hours sitting out in the sun, playing with a convex lens trying to burn paper by concentrating the rays of sun on it. So you see such a simple experiment shows that light is just another form of energy which when concentrated can even burn paper. Photography involves a similar phenomenon, light waves are simply captured by a lens system and concentrated on a film (chemically treated) or a digital sensor, for a small period of time. This film or digital sensor produces the image as seen by the lens system of the camera. This is pretty much how our eyes function as well, in their case cornea is the lens and retina is the film/digital sensor.
So its all about light. Try answering these simple questions - what is light, how does it originates, how do you explain colors, why do different objects have different luster and texture. Proposing an hypothesis to explain the phenomenon of light must have been a challenging task. People have been amazed by what they see and some people get more excited if they are able to discern a pattern or fit it all into a model. There have been discussions to represent light as a wave (Hooke-Huygens-Young) or as a particle (Newton), later Maxwell studied light as an electro-magnetic wave and finally Einstein explained the optical phenomenon with the help of his Wave-Particle duality theory, which also laid the foundation for Special Theory of Relativity.
Lets look at the following concepts in order to get a better understanding -
The Concept of Energy!
Well energy is everywhere. Its just the form which varies. Its very similar to the concept of a number line. Its we humans who define numbers in the number line in order to differentiate them, so that they can be better understood and used for various purposes like counting or for quantifying distances etc. There is actually no difference between 1 or 10.434 or some irrational number...they are just points which make up the number line or for that matter the complex space or the sphere or the point. I think you get the point. Lets move further. So i would say everything is some form of energy, someplace where it is dense...then we may call it a solid object, other places where it is less dense, we may call it fluid. Again density is just another concept i.e. the way you observe things.
The Concept of Light!
All objects at all times are emitting some form of energy, a part of this is called light. So just imagine a case where there are only two objects - the Sun and you (your eye). Sun emits some energy (almost the entire spectrum of wavelength) which falls on your eye. The eye will absorb this energy and will interpret it in its own way. Its like Sun is communicating with your eye with the help of light energy and your eye interprets this signal as white light. Now imagine if there is another object say a red ball. The rays of sun fall on this ball. The ball is just another object which will absorb some amount of energy, emit some, transmit some and also reflect some. Since this ball appears as red to our eye, it means that the final outcome of this absorption, emission, transmission and reflection is a light wave with wavelength 630nm-700nm and some specific frequency which is interpreted by us as red in color.
The Concept of Color!
The waves of energy reaching our eyes have some properties - velocity, frequency and wavelength. We differentiate different waves based on these properties. Now if you take the wavelengths and arrange them in a number line then this number line is what we call a spectrum of colors and we recognize different colors by different set of wavelengths on this spectrum. Like red is 630nm-700nm, green is 490nm-560nm and violet is 400nm-450nm, this range (400nm-700nm) is pretty much the color spectrum recognized by the human eye. We can interpret the wavelengths in this range. We need to understand that different waves interfere with each other and produce a combined effect by the time they reach the eye.
So if the signal consists of different waves of almost the entire spectrum then these waves appear as white to our eye, whereas if the signal consists of waves which lie outside our visual spectrum then this appears as black.
Lets get back to Photography!
As i said earlier - Photography means drawing with light. The instrument used for this purpose is the camera, which consists of a lens system and a sensor where the image is formed. To form the image you need light to fall on the sensor only for a small time. We can imagine the sensor as our canvas where our image will be formed, lens can be assumed as a funnel through which different colors (light/image) will fall on our canvas. Now lets look at the following basic terms used in Photography -
Exposure - The process of image getting formed on the digital sensor/film (canvas) is called
Exposure. If a lot of light, more than what is required to make a proper image, falls on the digital sensor/film then the image will be over exposed. Its very similar to pouring a lot colors through the funnel on to the canvas and the colors splash out when they fall on the canvas. Similarly if light falling on the film is less than required to create an image then the image will be dull i.e. under exposed. Proper exposure is very important in order to get a clear image - neither very bright nor dull.
Aperture - Aperture is the size of the opening of the lens on the camera. You can compare it to the size of the funnel hole. Crudely speaking the larger the size, more is the amount of light that can enter the lens system. So time required to create an exposure will be less if the aperture size is large. Depth of field of an image mostly depends on the size of the aperture along with other things like the focal length of the lens. Generally speaking larger the aperture smaller is the depth of field and vice versa.
Shutter Speed - Shutter Speed is the time for which the aperture remains open and allows the light to enter the camera, so shutter speed is another thing which controls the amount of light entering the camera and hence is very important to achieve the correct exposure. So if you increase the aperture size and you want to keep the same exposure then you would have to increase the shutter speed i.e. the shutter will close quicker now. We need to understand that the actual image can be very different with fast or slow shutter speed. Fast Shutter Speed freezes motion and is generally used to capture fast moving objects like in sports or kids who wont stay still for that perfect picture. Slow Shutter Speed is generally used to capture images shot in low light of static objects, like of a distant skyline at night. Slow Shutter Speed can also be used to imply motion, by keeping both the static and moving objects in the picture. Use of a tripod is recommended while using Slow Shutter Speed.
Light Meter - How do you know that you have the right exposure, that is you have the correct aperture and shutter speed settings. Light meter present on your camera is your guide. Light meter analyzes the scene and evaluates and measures the light offered by the scene. There are many evaluative methods that can be used by the camera like center-weighted, matrix-based etc. and based on these methods the light reading is obtained. You may use these readings as a reference while setting up your aperture or shutter speed.
ISO - ISO decides the sensitivity of the film or the digital sensor. It can be compared to the absorption strength of the canvas. Higher the ISO higher is the sensitivity and lesser amount of light is required to achieve the same exposure. So higher ISOs are again used for low light photography or for capturing fast moving images. Generally most of the exposure settings can be controlled with the help of aperture and shutter speed, while keeping ISO at 100 or 200.
Focal Length - To understand the importance of focal length, we need to understand image formation by a convex lens. All lens systems in a camera can be represented by an equivalent convex lens of a given focal length forming a real image on the film or digital sensor.

Look at the lens diagram given above, image formation for a thin lens is governed by the following formula -
1/S1 + 1/S2 = 1/fand Magnification = - S2/S1 (negative sign means that the image is inverted as compared to the object)
Here
f is the focal length of the lens
S1 is the distance of the object from the lens
S2 is the distance of the image from the lens
Now if you keep the focal length as same and increase S1, then you will notice that S2 will decrease as per the above equation. Also notice that Magnification of the image will also decrease. Which means that as the distance of the object increases from the lens, its image is formed nearer to the lens on the other side. The digital screen or the film where image is formed in a camera is at some fixed distance from the lens. So out of all the objects in your view, the object whose image is formed on the digital screen or film is said to be the object in focus. All the other images won't be as sharp as of this object. Now suppose that the object is placed right at the focal distance of the lens so that S1=f, in this case as per the equation
1/S1+1/S2 = 1/f1/S2=0 i.e. S2 tends to infinity. So the image of the object will be formed at infinity and if S1 is less than f then image is formed on the same side as the object, which is the virtual image and it is no good to be captured by the digital sensor or the film. So if you want to photograph something really close to your camera, you need to have a lens with really small focal length i.e. for Macro Photography.
Film Size - Film size or the size of the digital sensor is actually the size of your canvas, where the image is drawn. Generally the film size is 35mm (diagonally). So the image we draw is also limited by the canvas size, which means that image magnification is important. This is where the Magnification formula comes into play -
Magnification = -S2/S1 = f/(S1-f)Telephoto Lenses - We can see from the above equation that if you increase f and keep S1 constant, this is going to increase the magnification i.e. a bigger image of a distant object will be formed if you use a lens with larger focal length, these lenses are Telephoto Lenses, as they help you get a magnified image of a distant object.
Wide-angle Lenses - On the other hand if you decrease f and keep S1 constant, this is going to decrease the magnification, which you may feel is not exactly desirable. But consider an object in a scene near you, this object because its near has a good enough magnification, but it may happen that it is filling up all the space of your film canvas. So what do you do to get more of the scene on your canvas - you use a lens with a smaller focal length, this will make the object smaller on your film canvas and you can accommodate more of the scene. These lenses are Wide-angle lenses, as they help you get a wider picture.
Ultimately its Creativity!I have spoken a lot about optics and photography, but the intention was not to confuse you or boggle you with nerd terms. I have tried to apply basic optics in order to understand how a camera works. These are just the basics, and there is a lot of creativity involved in using each aspect of your camera. As i said photography is drawing with light, so light and camera are just the tools which you can use for your drawing, but what you draw and how you draw depends on your vision and creativity.
The first step would be to understand what are the features provided by your camera and use them fully. It may be a basic digital camera, but you should definitely try to understand and use all its features. Once you start understanding it, you will see how much fun it is, and then you may even become oblivious of the optics behind your camera because your creativity will take over and i think that would be really cool :))
ReferencesHere is a list of some good starter websites and books -
 Understanding Exposure by Bryan Peterson - This will explain you the 3 key factors involved to get the correct exposure - Aperture, Shutter Speed and ISO. Excellent book to start with, it also has some brilliant pictures which will inspire you and push you deeper into photography. A must have book, don't wait to buy it if you are interested in taking good pictures.
- photo.net- Excellent reference site for tutorials on photography, news and reviews about photography equipment, forums and discussions, pictures. Its a real good site.
- dpreview.com - Look here for in depth expert reviews on cameras and lenses. They cover their reviews in detail and it will definitely help you in making that choice.
- Wikipedia - I don't have to comment on wikipedia, but like for everything, it is also the ultimate source of information on optics, light, lenses, photography etc.
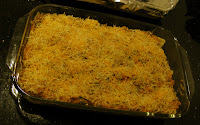 Now this one requires time and a little bit of expertise to make it, but once prepared you would realize that it is worth the effort. It is one of the best Italian dishes I have eaten, well probably because I ate the home cooked version. For people who don't know what Lasagna is - its another type of pasta. It comes in long flat strips, 3-4 cms wide and 12-15 cms long. Its prepared by making alternate layers of lasagna stripes, meat sauce and cheese one over the other. You prepare the sauce separately, boil lasagna and then make alternate layers. The outcome is layers of creamy, spicy, tangy and very tasty food. Well lets look at the recipe - its quite simple if you break it down into steps.
 Mix everything well and then leave it on medium heat until the spinach get cooked. When the spinach is cooked and the sauce is slightly thicker then turn off the heat and add Sour Cream to it. Mix it well and then taste the sauce - add extra salt, red chilly powder or Sour Cream as per your taste. All right your sauce is done now keep it aside. It is a creamy, spicy and tangy, i am sure you would love it. You can have your own version of sauce - just experiment carefully :)

